
How to glue tiles on the ceiling?
Ceiling tile is a lightweight polystyrene material that has been in demand for many years. Thanks to it, you can hide the imperfections of the ceiling surface, as well as decorate it with a material of different colors and with different patterns. It is not difficult to work with the tile; it is mounted easily and quickly. Even a beginner will cope with this, but with the condition that he knows how to glue the tiles to the ceiling correctly. We will talk about this in our article.
to contents ↑Types of Ceiling Tiles
Despite its similarity, if you look closely, ceiling tiles still have significant differences. It is not only about the shape and pattern, but also about the appearance - the smoothness of the surface, density and other "little things" on which the appearance and life of this type of finish depends. This is due to the use of different materials, as well as technology.
Extruded:
- The surface is smooth, with no visible grit.
- As a rule, the thickness is small - up to 3 mm.
- The material itself is dense, can be painted in different colors, including wood or marble.
Important! This tile option is made from expanded polystyrene. It is easy to maintain, easy to install, but quite expensive.
Foam or stamped:
- It seems more loose and grainy.
- The surface of this tile is more porous, which is why it becomes clogged with dirt, so it is more difficult to maintain.
- After its installation, it is desirable to paint it, but not with water-based paint, but with acrylic dispersion.
- As a rule, plate thickness is up to 12 mm.
Important! This type of ceiling tile is not very convenient to use, as it often breaks, wrinkles. When buying in a store, it is better to take the extra 10% of the stock. Its advantage is its low price.
Injection:
- Expanded polystyrene is “baked” in a special form.
- The main difference is a clear picture.
- According to the characteristics and price - this is something between the above options. It is quite easy to work with this tile, if desired, it can be painted.
to contents ↑Important! It is easiest to glue and care for extruded polystyrene tiles. The second in quality is considered injection, and the most “capricious” in installation and maintenance is stamped.
Dimensions and structure
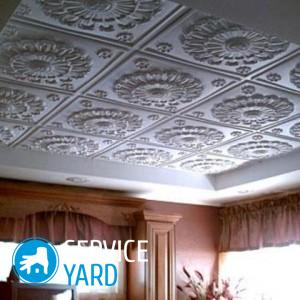
Ceiling tiles are most often produced in the form of squares with a side of 50 cm. But there are also non-standard rectangular options. According to the type of surface, tiles exist with a piping that forms a clear seam at the junction, or seamless shapes, the edges of which can be either even or twisty.
to contents ↑Important! The principle of installation does not change from the type of edge; here only the appearance of the product changes. There are a lot of design options for this type of finishing material. There are floral, geometric, without pattern, with a relief.
Quantity calculation
Calculate the number of tiles needed as follows:
- It is necessary to make a drawing of the room, trying to maintain proportions.
- Next, you need to place the tiles with maximum precision on the paper from the ceiling center to the edges, after which the surface of the ceiling should be placed in the same way.
Calculation example:
- The total ceiling area is 19.35 square meters. m (i.e. 4.3 m by 4.5 m).
- The shape of the tile is square (50 by 50 cm). So - for our ceiling you will need 72 pieces (9 by 8) of whole products.
- In the event that gaps remain, the dimensions of which will be less than half the tile (less than 25 cm), then one tile will go to cover two gaps. If the gaps are more than half, then for each such gap a whole tile will be needed.
- As a result, it turns out that for the ceiling we need 81 full tiles.
to contents ↑Important! When buying, it is advisable to immediately buy 10% more tiles in case of unsuccessful cutting, breakage or deformation.
How to glue?
The most popular adhesives for ceiling tiles are:
- Moment.
- Titanium (special).
- "Liquid Nails".
- Eco-Naset (universal).
to contents ↑Important! As practice shows:
- Working with “liquid nails” is much faster and easier, but because of the high expense - it is extremely uneconomical.
- An alternative is rubber glue. Its low consumption makes it possible to reduce financial costs. The main disadvantage is the need to dry the glue mixture before pressing the tile to the ceiling.
Work order
Laying the ceiling tiles in a certain order. It is undesirable to skip the stages of preparation and layout, because it depends on them how attractive the ceiling will be as a result. So, how to glue the tiles on the ceiling?
Surface preparation
The preparation of the ceiling surface for tiling includes 2 stages:
- Removing the old coating.
- Primer treatment.
All coatings are subject to liquidation if they do not differ in a solid, even and durable surface. An exception may be waterproof acrylic paint - the tile adheres to it better than to whitewash.
Important! The problems of adhesion of the material to the surface are solved by a primer, which improves the adhesive properties of the substrate.
Markup
The following layout options are available:
- From the center. The midpoints of each side of the ceiling should be marked. Draw perpendiculars to each of the points received: they should intersect in the center. Start gluing the tile so that in the center there are 4 corners of 4 plates.
- From the central tile. It is necessary to find the center of the surface in the manner described above. Stick the first tile so that its center coincides with the center of the ceiling.
- From the lamp. Here the starting point will be not the center, but the lamp, to which the corners of adjacent blocks are adjacent.
- From the corner. This option is appropriate if the geometry of the ceiling is perfect. The first tile should be glued from the selected corner.
- Combined (from the center and from the lamp). You should find the midpoints of any two opposite sides, then connect the points with a straight line. Through the lamp, draw a straight additional line, which will lie at an angle of 90 degrees to the first. The first tiles must be glued to the corners of the resulting markup.
Important! For rooms with a small area, gluing tiles to the ceiling is recommended from the center. This method makes it possible to get evenly cut tiles on the edges.
For large rooms with the correct geometry, it is much easier to start work from the corner. It’s also convenient to start from the lamp - you don’t need to cut a hole in the middle of the plate.

Sticking
Blocks are glued to the ceiling with or without a seam. Of course, the second option looks more aesthetically pleasing.
To make the decoration look like a seamless canvas:
- The edges of the plates should be pressed tightly against each other, leaving no gaps. This will be possible if the material has precise geometry. Almost perfect geometry have calibrated blocks, which differ in size by no more than one millimeter.
- You can hide the seams with the help of curly or corrugated plates. A corrugated pattern is capable of forming an abstract picture that looks uniform. The edges of the curly blocks are wavy or zigzag. Thanks to them, the ceiling canvas looks solid.
Ceiling tile location options:
- Twisting or alternating diagonals of plates that differ in color or texture. To do this, the tile is glued one after another, alternating two different types depending on the pattern and placing them not with the edge, but with the angle to the sides of the ceiling.
- In a checkerboard pattern. Blocks that differ in color or texture are placed one after the other in a pattern so that their edges lie parallel to the sides of the ceiling.
- Rhombus. The same diagonal styling, only one color of plates is used here.
- The snake. They start from the center, placing in it two blocks of different colors. The gluing of the plates continues so that the two colors spin in a spiral one after another.
- You can make a drawing by decorating the ceiling around the perimeter with tiles of a different color. To do this, the design starts from the corner, and the rest of the space is filled from the center. If in the center there should be a drawing, that the pasting starts from the center point.
to contents ↑Important! To avoid errors, mark the picture in advance.
Options for gluing tiles for whitewashing
To properly glue the ceiling tiles on the whitewashed ceiling, you can apply one of the following methods:
- With a primer.
- By scraping weak areas.
to contents ↑Important! The primer increases traction. By applying the composition to the ceiling, the surfaces are allowed to dry completely. But if you do not want to use a primer, then you can apply the second method - you should remove the whitewash in those places where it began to exfoliate. Further, more glue mixture is applied to the plates and is pressed to the ceiling longer so that the glue penetrates well through the layers of lime.
Finishing parts - foam freezes
Foam friezes give the ceiling a final look. It is a transition element between the wall and the ceiling.
Important! It is advisable to glue the cutters after finishing the installation of the ceiling tiles. If you do this before installation, then adjusting the size of the plate will then be much more difficult.
Friezes should begin to be glued from the corner. To do this, it is necessary on one side to cut off part of the bar at an angle of 45 degrees. A pair of planks with such an angle forms a right angle. Length adjustment is carried out in the middle.
to contents ↑Stock footage
The result of gluing the ceiling with tiles will depend on the quality of work. The finished surface will look attractive only if you follow the procedure described above. Correctly gluing the ceiling tiles, in fact, is not difficult - it is important to follow the rules and not rush.
- How to choose a vacuum cleaner taking into account the characteristics of the house and coatings?
- What to look for when choosing a water delivery
- How to quickly create comfort at home - tips for housewives
- How to choose the perfect TV - useful tips
- What to look for when choosing blinds
- What should be running shoes?
- What useful things can you buy in a hardware store
- Iphone 11 pro max review
- Than iPhone is better than Android smartphones
Report typo
Text to be sent to our editors: