
How to repair a tap for a drinking water filter?
How to repair a tap for a drinking water filter is one of those problems that absolutely everyone has encountered. Small leaks do not seem to cause much harm, but they can be pretty annoying. And if you do not pay due attention to the mixer on time, then you can provoke an emergency. Despite the fact that there are more than enough types, types of faucets in the modern plumbing market, it is quite simple to make repairs, especially if you know how. In order not to make a mistake during the repair, pay attention to the information that we have collected for you in this article.
to contents ↑The correct sequence for disassembling the mixer
Before repairing the drinking water filter tap, it must be disassembled to identify the cause:
- At the initial stage of work, remove the small decorative cover. As a rule, on this plate there are two multi-colored points that indicate the rotation of the tap to add cold or hot water. If the direction of fluid flow does not match, flip the cover back.
- As soon as you remove the decorative cover, inside the hole you will see a screw that is there to hold the lever in position. You can unscrew this clamp using an ordinary or Phillips screwdriver. There are times when, in order to remove the tap, you need a hexagon.
Important! If you can’t loosen the screw with a screwdriver, the lock is rusted or the thread is broken, then in this case, pull the lever with force. The screw head should come off the plastic nozzle.
- After you removed the lever, remove the decorative cup. It so happens that this part is also impossible to remove in the usual way. You can loosen the insert with your hands. In order to improve the effect, place a soft, dry cloth in the place where you apply the force.
to contents ↑Important! If you were unable to remove the cap with your hands, you can use:
- Pipe wrench;
- Pliers.
Mixer Repair Procedure
Before proceeding directly with the repair of the mixer, you must shut off the water supply. As soon as the water is shut off, open the faucet and wait until all its remains drain.
Important! Given that all work will take place in extreme proximity to the surface of the sink, you can even cover it with a cloth. You may well place an unnecessary rag in the place where the mixer is located.
The following procedure may vary slightly, given that there are different models and types of mixer used. But here the general picture of crane repair looks something like this:
- First you need to get rid of a special decorative plug that is located on the front of any mixer. It is an indicator of hot and cold water. Under the plug is a fixing screw that you must unscrew.
- Remove the lever itself. Do not put too much effort, because the faucets are most often made of cheap alloys, and you can easily damage the structure.
Important! If the lever does not give in, you can pour it with hot water for several minutes.
- Under the lever itself is a decorative dome, which must be carefully removed.
- Next, you must unscrew the clamping nut, which is designed so that the structure dwells in place.
- It all depends on the type of mixer, inside there can be a distribution ball and other elements of a hinged mixer, as well as a plastic cartridge with ceramic discs inside.
Important! If we talk about distribution balls, you must make sure that the balls themselves are intact, after that check the condition of the gaskets, springs and seals. If necessary, replace damaged items. If you have a cartridge installed, then carefully remove it and head to the nearest store in order to find a replacement.
- Underneath the cartridge are usually rubber saddles that become unusable over time. Wash away any residual dirt and other debris that has been caught during operation.
- If you are replacing a cartridge, thoroughly clean the seat itself from corrosion. During the installation process, pay attention to the fact that the latches are exactly in the grooves, otherwise the mixer will not work properly.
In the event that the repair failed to bring a visible effect or only partially eliminated the problem, then find other possible causes of the malfunctions.
Consider the remaining possible problems.
- Clogging the aerator can cause the water pressure to be very different from what it will be in the bathroom. To fix this problem, remove this item and thoroughly clean it.
Important! If rust became the cause of the malfunction, then you will have to completely replace it in order to repair the faucet for the drinking water filter in a quality manner.
- Loud noise from the tap during the water supply may indicate that the gaskets are not suitable in size. This is especially manifested precisely in cases where the gaskets that stand there, you cut yourself. In this case, disassemble the mixer and cut the gaskets.
- The water supply in the tap can also be significantly reduced due to clogging of the connecting flexible water pipes or hoses. After cleaning the faucet, replace the old hoses with new ones, because various deposits may well form on the old ones. They will ultimately lead to repeated failure of the hinge or the cartridge.
- If the faucet is located in the bathroom and when bathing, the lever that is responsible for switching the direction of the water lowers on its own, then simply replace the gasket. She is hiding under the spool itself.
Important! To perform this procedure, it is not necessary to dismantle the mixer, you can simply unscrew the nut, remove the hose itself, then change the gasket and return everything to its place.
- Changing the lower gasket is much more difficult, because it is necessary not only to disconnect the hose, but also to dismantle the adapter along with the spout itself. Next, completely remove the switch, spool and cam, then change the gasket and reassemble everything in reverse order.
to contents ↑Important! Own repair of a single lever mixer, in fact, is quite simple and does not require special skills and knowledge in the field of plumbing. The only thing you must always remember is that these devices do not suffer ill-treatment.
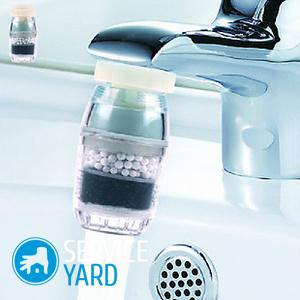
Can I fix the Aquaphor filter tap?
Of course you can. For this:
- Carefully inspect the tap for joints. If the crane is executed to the conscience, then they must be invisible. If they do exist, consider yourself lucky because the crane is collapsible.
- First remove the handle - there you will see a small cap, under which there is a screw.
- After that, remove the decorative trim, which should be removed by hand.
- After - the crane box.In principle, it is also being repaired, but it is better to take it with you, select a replacement from a reliable seller.
to contents ↑Important! If there are no connections, that is, a tap fitted - replace the entire tap completely.
Stock footage
In this article, we talked about all the possible problems with the crane and how to repair it. We hope you managed to fix the situation yourself without the help of a wizard.
- How to choose a vacuum cleaner taking into account the characteristics of the house and coatings?
- What to look for when choosing a water delivery
- How to quickly create comfort at home - tips for housewives
- How to choose the perfect TV - useful tips
- What to look for when choosing blinds
- What should be running shoes?
- What useful things can you buy in a hardware store
- Iphone 11 pro max review
- Than iPhone is better than Android smartphones
Report typo
Text to be sent to our editors: