
How to install a split system yourself?
Now many people want to install in their apartment not just air conditioning, but a split system. This is understandable, this system has a lot of advantages: it does not block natural lighting, since there is no need to cut it into the window frame, it does not depend on the general air conditioning system of the house as a whole, and lastly, the system consists of only two blocks - external and internal . The only thing that stops many consumers when buying is their ignorance of how to install the split system themselves, since this requires basic knowledge on installing climate control equipment. We will try to rectify the situation and introduce you to the rules for installing such equipment. Let's consider everything in order.
to contents ↑What is a split system?
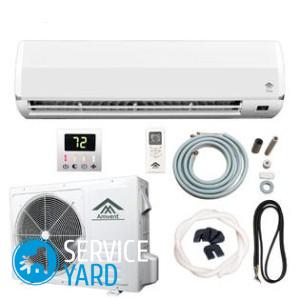
The air conditioning system consists of two separate units: the outer one is a condenser, the inner one is an evaporator. These blocks communicate with each other using electric wires and two copper tubes through which the refrigerant circulates.
The indoor unit also has a thin plastic tube through which condensed moisture is removed from the system.
Important! According to all rules, a pipe that performs a drainage function must be connected to a special drain tank or sewer pipe. But for some reason, many take it out and water from the tube drips onto people’s heads or under their feet.
The principle of the system
Climatic equipment works quite simply:
- If it is necessary to cool the room, then the refrigerant passes through the copper tube from the heat exchanger of the outdoor unit to the heat exchanger of the indoor unit. That is, in this case, freon is treated with a fan, and cold air leaves the air conditioner.
- If the room needs to be heated, on the contrary, then the heat pump of the external condenser begins to function as an evaporator, and the evaporator, in turn, starts to work as a condenser.
Important! In the external unit of the split system is a compressor, the main function of which is Freon compression. This process contributes to a significant increase in the efficiency of the device.
Methods of mounting indoor units
Indoor units of the climate system according to the mounting method can be:
- Wall mounted.
- Floor and ceiling.
These moments must be known in order to understand how to install a split system yourself.
- Most often, in the apartments of multi-storey buildings, wall blocks are used. To change the direction of the air mass flow, wall units are equipped with movable blinds. The power of wall-mounted devices is specifically limited by manufacturers, since a very strong stream of chilled air can blow everything in its path in a small room.
- If a split system is needed for spacious rooms, for example, for workshops and offices, then in this case more powerful equipment with a floor-ceiling indoor unit is installed.
When is it better to take up the installation of the climate system?
Installation of the system is best timed to repair, since the work will be dusty and serious. To install electrical wires, you will have to walk on more than one wall. In addition, if you decide to independently install a split system, then you should take into account some important factors:
- The seller is not responsible for the failure of the goods if the installation work was done by a non-specialized organization.
- Before proceeding with the installation of the climate system, it is necessary to understand what it consists of and how it works, so that even if the installation is done by specialists, you can control the progress of work and their quality.
- To install the air conditioner yourself, you need a special tool. It should be borne in mind that the list of specialized equipment is extensive, and not everyone has the skills to work with them.
Important! To save money, we advise you to do the following: do the main work yourself, and entrust the connection of the system and start to specialists. In this case, the work will be cheaper, and most importantly - the warranty on the goods will be preserved.
So, what can you do yourself to install the split system:
- Prepare the entire electrical part.
- Outline the “track”.
- Punch a hole in the wall to bring the “route” to the street. This is the hardest part of the job and it costs a lot of money. Therefore, having done this work yourself, you will save the lion's share of the money that you need to pay specialists for connecting the system.
- Strengthen the blocks.
 To install the split system successfully, adhere to the following rules:
- Installation of the indoor unit is carried out at a distance of 3 meters from the floor and at least 10 cm from the ceiling.
- Do not place the indoor unit above the cabinets, bed, or near heating elements.
- Do not install the indoor unit behind curtains, screens, curtains, or other obstacles to the flow of air.
- Do not install the indoor unit in rooms with an electrical noise source: induction and microwave ovens, electric ovens, in workshops with power tools. Interference from equipment can damage the processor unit.
- You cannot install a split system - its outdoor unit, on your own, if you live above the second floor. It is dangerous to health and life. If you live on the top floor, then the outdoor unit can be installed on the balcony or loggia. It is better, of course, if the equipment will be located on the north side or east. To install the outdoor unit on the balcony, you can use homemade small brackets.
- The length of the freon path between the indoor and outdoor units should not be less than 3 meters.
- Install the outdoor unit in such a way that there are no obstacles in front of it at a distance of 3 meters, otherwise, air circulation will be difficult.
- For a split system, it is necessary to conduct separate wiring and install a separate machine on the shield.
Tools for mounting a split system
In order to install the split system yourself, you will need a number of devices and tools.
Important! They can be rented or purchased. The quality of work, as well as the durability of the air conditioner, directly depends on the quality of the equipment for installation.
To work on installing the climate system, you will need the following equipment, which can conditionally be divided into such groups:
- Electrical equipment:
- Hammer with a set of chisels. This tool is necessary for punching holes in the main wall.
- Bulgarian with a diamond disk.
- Pipe Tools:
- Pipe cutter for copper pipes. In no case can you cut the freon tubes with a hacksaw for metal, as copper lint will surely remain in the lumen, which will damage the compressor.
- Tube flaring kit. The improvised means cannot be used, since it will not be possible to achieve complete tightness.
- Scouring. This is a tool for stripping the cut ends of pipes. The use of files and files for this purpose will lead to the formation of sawdust.
- Hydraulic pipe bender.
- Devices for electrical work:
- Tester.
- Phase indicator.
- Soldering Tools:
- Burner.
- Copper-phosphor solder.
- Refrigeration tool:
- Vacuum pump.It is necessary for processing the refrigeration system before filling it.
- Pressure gauge. Required to measure refrigerant pressure in the system.
to contents ↑Important! Take note of a few valuable recommendations, thanks to which it will be easier for you to install the split system yourself:
- If the wall is concrete, then the armature detector will not interfere, since if the tool hits the armature during drilling, you will have to punch another hole.
- Copper pipe is better to buy a whole bay. An extra wire will always come in handy, but long pipelines will lower the external unit lower. Be sure to ensure that the ends of the tube in the bay are factory-rolled. The tube must not have cracks or dents.
- Be sure to practice trimming and re-trimming pipes: cut them in a circular motion, and when re-trimming, hold the tube with the end down so that the scraped burrs do not fall into its lumen.
How to install a split system?
Installation of the climate system is carried out in several stages. Let's consider each of them in detail.
Stage number 1. Choose the location of the air conditioner
Following the above rules, determine where the internal, and where the external unit will be located.
Stage number 2. Installation of electrical wiring
Even the smallest air conditioner consumes 1.5 kW of electricity. Therefore, the climate system needs to lay separate wiring with a cross section of no less than 1.5 sq. Mm. It is also necessary to install a separate circuit breaker in the shield.
Important! Connecting the wires to the input shield, find where the phase and zero are located, using special indicators, and mark them at both ends.
Stage number 3. Install the external unit
If you live no higher than the second floor, then using a powerful punch, drill a through hole in an external wall with a diameter of 8 cm. Recommendations for a hole of 60 mm or 50 mm clearly do not take into account thermal insulation.
Important! Before you start punching a hole, be sure to fence off a section of the street under the wall with a tape so that a piece of plaster or concrete does not harm people or someone else's car.
Next - attach the brackets for the outdoor unit with reliable bolts. In doing so, consider the following tips:
- The back wall of the block should not fit snugly against the wall of the house.
- The distance between the blocks should not exceed 15 meters, and the height level between them should be no more than 3 meters.
- The brackets must be able to support the weight of the equipment, taking into account various weather conditions.
- Do not install the outdoor unit directly under the drainage hose, since the freon tube is also output there. Better to step aside 40-50 cm, otherwise - moisture accumulating in the condenser will fall on the inner wall of the air conditioning compressor.
- When installing the equipment, make sure that the unit is placed strictly horizontally, without any slopes. Control the installation of the outdoor unit using the building level.
- Attach the unit to the brackets with powerful bolts.
Important! It is advisable to install a visor over the unit to protect it from precipitation.
Stage number 4. Mounting the indoor unit
The indoor unit is mounted in a room on the wall. Before proceeding with the installation, be very careful about its placement. The unit should be located at a distance of at least 10 cm from the ceiling - this is necessary for the efficiency of the system, and at a certain distance from the walls.
Important! All these parameters are indicated in the device passport.
The indoor unit must be placed strictly horizontally so that all condensate flows into the drainage system, otherwise, water stains on the floor cannot be avoided.
Important! In the package of delivery of the product, there must be a special mounting plate that is attached to the wall, and on which the unit itself is hung.
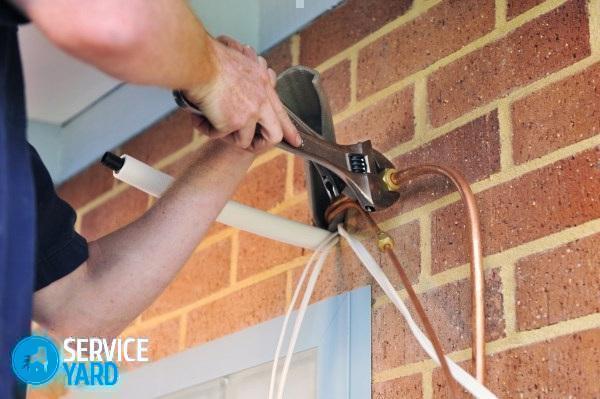
Stage number 5. Pipe connection
According to the planned route of electrical wiring and freon tubes, make grooves (strobes) in the wall using a grinder with a diamond disk or a chamfer.There is another option - the entire trunk can be hidden in plastic decorative boxes or covered with skirting boards.
Important! In order not to make a mistake and correctly connect all the tubes, study the installation instructions for the split system.
Further actions are as follows:
- Measure the required length of the copper tubes. To do this, measure the distance between the cranes of the blocks.
- Cut them with a margin of at least 1 m. The excess will go into bends. Remember to bend the tubes very carefully to prevent wrinkles and kinks. The permissible bending radius of the tubes is at least 10 cm.
- Put heat insulators on the refrigerant pipes - hoses made of polyurethane foam or thermal insulation made of flex. In some kits, heat insulators are supplied.
- Slide threaded flanges onto the tubes and flare the ends.
- Connect the piping to the fittings. The main thing - do not mix up the connection. Many manufacturers of the climate system made cold and hot fittings of different diameters. Tighten flanges on fittings tightly, but not tight. When sealing, you will reach the threaded connections.
- For a drainage system, prepare a piece of reinforced plastic tubing.
- Connect the pipe to the drain pipe using a threaded flange or heat-shrinkable pipe. Drainage should be installed at a slope of at least 5-10 mm so that water flows naturally.
- Connect the wiring between the blocks. The main thing is not to confuse the connection conclusions of the indoor and outdoor units, for this use a cable with multi-colored conductors.
Thus, you practically installed a split system with your own hands. It remains only to invite a specialist to seal, vacuum and start the system. The main thing is that you retained the warranty on the equipment and saved the lion's share of the installation costs.
If you want to learn how the following steps go, then read on.
Stage number 6. Sealing and evacuation
To check the sealing, you can use a leak detector, or you can use the old folk method - soap solution.
To prepare the solution:
- Get 0.5 L of distilled water from the pharmacy.
- Heat the water.
- Throw shavings of laundry soap into the water.
Further actions are as follows:
- Connect the rubber hose of the bicycle pump to the outlet nipple fitting.
- Brush a soap solution on the threaded connection.
- Pump up air and watch for the appearance of bubbles.
- After the bubbles no longer appear, tighten the screw connection an additional ⅛ turn.
- After completing work, clean the soapy solution with a damp cloth.
Important! It is better to carry out the work on checking the sealing together: one pumps up air, in the second - puts a soap solution and watches the bubbles.
After checking the sealing, the system must be evacuated, that is, remove the dust, moisture and air that has got there. Without these measures, it is impossible to ensure the effective operation of the device.
Vacuuming is carried out using a special pump connected to the system using a manometric manifold and flexible hoses:
- Turn on the pump and open the port on the external unit.
- After the gauge needle goes to vacuum, close the port.
- Turn off the pump.
- This entire procedure can take 15 minutes. However, do not rush to turn off the pump with a pressure gauge, as the arrow can change its position.
Important! Leave the pressure gauges in place to check the system pressure again during testing.
Stage 7. Testing
For testing, fill the system with freon from a cylinder through a special adapter on which the pressure gauge is installed.
Important! It is only possible to start the refrigerant after you make sure that everything is tight.
It is necessary to charge refrigerant in the following sequence:
- Open the feed tube.
- Open the suction tube.
- Wait until the pressure gauge displays the pressure indicated in the instructions.
- Turn off the freon supply.
Important! Freon air conditioners cannot be filled with freon, and vice versa.
Further actions:
- During the test, turn on the circuit breaker so that the air conditioner itself enters the mode. If this does not happen, then run the test using the remote control.
- Let the device run for about 15 minutes so that the freon is distributed over all the tubes and make a control pressure measurement.
to contents ↑Important! On this, the installation of the climate system can be considered completed. A properly installed air conditioner should work silently, without changes and internal rattling.
Stock footage
We hope that the information in the article helped you understand the work of the split system and the stages of its installation. If you have any doubts about your abilities and knowledge, then there is always the opportunity to turn to specialists, because now you have enough information to control their work.
- How to choose a vacuum cleaner taking into account the characteristics of the house and coatings?
- What to look for when choosing a water delivery
- How to quickly create comfort at home - tips for housewives
- How to choose the perfect TV - useful tips
- What to look for when choosing blinds
- What should be running shoes?
- What useful things can you buy in a hardware store
- Iphone 11 pro max review
- Than iPhone is better than Android smartphones
Report typo
Text to be sent to our editors: