
Mirror tiles for the bathroom
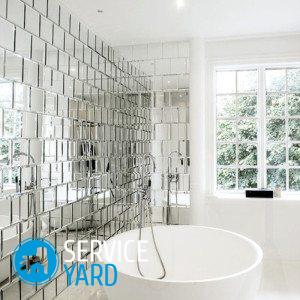
It’s hard to imagine a bathroom without a mirror. Mirror tiles for the bathroom look even more unusual - a beautiful, unusual and incredibly stylish decor. To lay out a mirror of a certain size using tiles or to make “islands” of reflective material is up to you, since there are many possibilities for using this unusually beautiful material. Finding a convenient, aesthetic and practical option is easy.
to contents ↑Features
Proper use of mirror surfaces helps visually adjust the room. The dark room, thanks to the mirrors, seems lighter and higher, narrow - wider. An interesting design decision is the vertical reflective stripes, ending at the bottom with shelves of mirror material.
Important! Mirror tiles go well with regular ceramic. Two types of finishing materials only set off the beauty of each other. But opposite the window, you should not place a reflective surface, since it will quickly fade.
Many are interested in the question of practicality. People, appreciating the beauty of the decor, doubt its practicality, because it is believed that mirrors wear out quickly and are very fragile. This is not true:
- Modern varieties of mirror tiles for the bathroom are made in accordance with standards, therefore, in terms of strength and practicality, such a finish can successfully compete with the usual ceramics.
- The finish perfectly tolerates high humidity and temperature changes, is resistant to household chemicals and scratches.
The manufacturing technology of this unusual material is called jamming. Mufflers are added to the molten glass) special amorphous, gaseous or crystalline substances. They make the tiles optically heterogeneous and reflective.
to contents ↑Important! Is a bathroom with a mirror floor possible? In principle, yes, but experts do not recommend such experiments. This flooring may be beautiful, but it’s impossible to call it practical.
Advantages and disadvantages
Advantages of mirror tiles:
- Long service life.
- Resistance to acid and alkaline household chemicals.
- Fire safety.
- Simple care. Of course, such a finish requires more attention than conventional ceramic. However, a very small amount of special detergent is enough to make the tile shine again. On the mirror surface, limescale is washed off much faster than on ceramic.
- Aesthetics.
- Visual expansion of space.
Less disadvantages, but they are:
- If transported improperly, the material can be damaged - broken or scratched. However, this also applies to ordinary ceramic tiles.
- Over time, the mirror canvas sometimes darkens.
to contents ↑Important! You can avoid darkening the surface in the bathroom if you equip good ventilation.
Styling secrets
The complexity of installing mirror tiles in the bathroom can be significantly reduced if you know a few tricks:
- If you properly cut and prepare the material, installation costs will be significantly reduced.
- Make sure that the thickness of the tile joints is as small as possible. This is because it is impossible to achieve a perfectly smooth surface in the seam area. The optimal width of the inter-tile seam is 3-4 mm. However, individual elements should not be closely packed either.Due to size errors, the joints will begin to “play”.
- The duration of the hardening of the adhesive after installation is 3-4 days. Only then can grouting the tile joints.
- Before starting installation work, treat the transparent material on the back with liquid glass with sand. If the tile is opaque, it should be treated with bitumen or coarse sand. This is necessary to improve the adhesion of the material to the wall surface.
- Use “liquid nails” or silicone for mounting. In this case, the silicone composition should not contain acid, as this can cause spots to appear on the surface of the finish. You can also use cement-sand mortar.
Installation Algorithm:
- Before starting installation work, lay the cladding on the floor in such a way as you plan to place it on the wall. Panel fitting in this case will take much less time.
Important! Individual tiles may vary in size by 2-3 mm.
- Prepare the walls for cladding. Check how well the walls are aligned. This is because bumps will not allow you to create the perfect reflective surface.
Important! It is advisable to select the size of the tiles as carefully as possible, since the process of processing the edges after trimming can not be called simple.
- At the end of installation work, grout the joints with acid-free silicone.
Important! Silicone grout plays the role of waterproofing.
- After the grout has completely hardened, polish the mirrors with soft, clean textiles.
Stock footage
With proper installation and regular maintenance, the mirror cladding will last you long enough and will create a unique atmosphere in your bathroom.
- How to choose a vacuum cleaner taking into account the characteristics of the house and coatings?
- What to look for when choosing a water delivery
- How to quickly create comfort at home - tips for housewives
- How to choose the perfect TV - useful tips
- What to look for when choosing blinds
- What should be running shoes?
- What useful things can you buy in a hardware store
- Iphone 11 pro max review
- Than iPhone is better than Android smartphones
Report typo
Text to be sent to our editors: