
DIY furniture from a profile pipe
To date, metal furniture is widely used in personal plots and cottages. Unfortunately, due to its high cost, not everyone can purchase it. Nevertheless, taking the profile pipe as a basis, you can easily carry out the supporting part of chairs, tables and even benches. Such material is sold in hardware or construction stores, so it is not difficult to buy it for you. And in order for you to succeed, we will tell you how to make furniture from a profile pipe with your own hands in the shortest possible time and with maximum savings on your family budget.
to contents ↑
Profile Pipe General
A profile pipe is a pipe that has a rectangular, oval or square section. It is mainly made of carbon or low alloy steel. In very rare cases, stainless steel pipes are found.
Profile pipes are made by hot or cold deformation of an already finished round pipe billet. The manufacturing process consists of the following steps:
- A round pipe of the required diameter is made from a workpiece by bending.
- The finished round billet is fed into a special molding machine, on which deformation is carried out directly until the desired shape and cross section are achieved.
- In order to remove mechanical stress, the finished profile pipe is subjected to special heat treatment with subsequent control of the weld.
Important! Due to the presence of stiffeners, products made from a profile pipe are durable. Their metal frame is able to withstand much more load than the frame of a standard round pipe.
In addition to a rectangular cross-sectional shape and a special production method, profile pipes have several more advantages:
- High performance. This is due to the fact that all the pressure exerted is directed not to the middle of the finished product, but to stiffeners, which protects it from deformation during operation. Therefore, products from shaped pipes can last more than a dozen years.
- The rationality of geometric shapes. Parallelepipeds are much easier to transport and store, in addition, they are easier to combine with flat surfaces and have a strong mount.
- Practicality. Due to the angular shape, it becomes possible to save material in the manufacturing process.
- Simplicity of operation. Profile pipes can be connected both by bolts and by welding.
Important! When using galvanized pipes, fastening is best done with bolts. This is due to the fact that during welding the zinc layer is broken.
- High resistance to various temperature differences.
to contents ↑Important! When starting to work with metal professional pipes, it is important to remember two things:
Otherwise, all your work is down the drain.
DIY pipe products
Structures from a profile pipe can be very diverse. We bring to your attention the basic options that you can easily make at home.
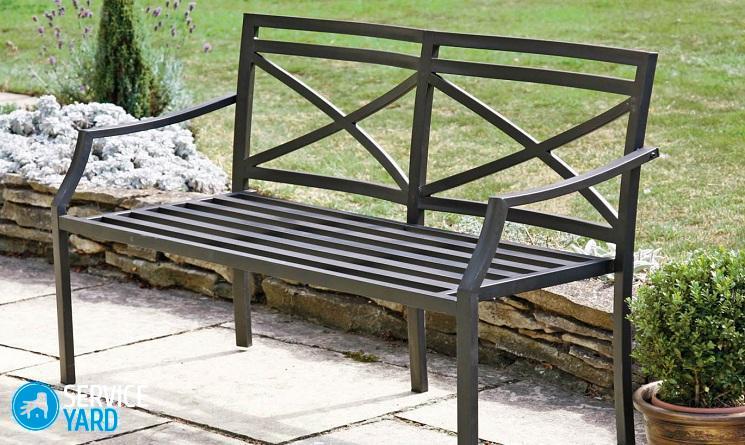
How to make a bench from a professional pipe with your own hands?
To make a garden bench 2 meters long and 45 centimeters high, you will need the following tools and materials:
- 3 cuts of 1.8 meters of a profile pipe with a square section;
Important! Pay attention to the fact that the wall thickness of the profile pipe should be 3-4 millimeters.
- 2 metal corners 2 meters long and a shelf width of 25-30 millimeters;
- 3 edged boards with a thickness of 20 millimeters and a width of 15 centimeters of 2 meters;
- Miter box;
- Grinder with a cutting disc;
- Xenovka;
- Drill;
- Hammer;
- Drill for metal with a diameter of 5 and 6 millimeters;
- 12 metal screws with a diameter of 6 millimeters;
- Drill on a tree with a diameter of 6 millimeters;
- 9 countersunk head screws with a diameter of 6 millimeters and a length of 70 millimeters;
- Stain;
- Varnish for working with wood;
- 0.5 liters of Kuzbasslak;
- Brush;
- Solvent 646.
Once all the materials have been prepared, you can proceed directly to the manufacture of a garden bench from a profile pipe with your own hands. To get started, make supports. You will need 3 of them. For this:
- Take the previously prepared cuts, make the necessary marking, and then cut it with a grinder. The cut line should run along 3 sides of the pipe.
Important! The markup is best not done by hand, but performed using a miter box. Using a grinder, observe safety rules, while trying not to touch the 4 facet of the support.
- Helping yourself with a hammer, bend the profile pipe. Thus, you will get 3 finished supports with a length of 45 centimeters.
- Using the corners, connect all three supports into one single bundle. You need to do this in the place of support where the connection of the different ends of the pipe is carried out. For these purposes, drill in each flange of the corner paired holes with a diameter of 5 millimeters.
Important! Pay attention to the fact that the first and third pairs of holes should be at a distance of 20 millimeters from the edge, and the second should be exactly in the middle.
- Attach the bench supports to them and make markings through the holes on the pipe. After - drill holes in each support, using screws, connect all the elements.
Important! Be careful with the finished workpiece, as at the moment it is still very fragile.
Next, you need to prepare the boards:
- Using sandpaper, round the edges. You need to do this without fanaticism, only 1-2 millimeters.
Important! You can measure the rounding value yourself. To do this, just check it by touch.
- In order to emphasize the structure of the tree, treat the boards with a stain. If this is not available, then a concentrated solution of potassium permanganate will be an excellent substitute.
Important! Before starting work, always check the finished solution on the back of the board. It should only darken, but in no case blacken.
- If the boards become too dark after treatment with stain, then at this stage you can sand them with fine sandpaper.
- In each wooden workpiece, drill three holes for bolts with a diameter of 6 millimeters. The first and third holes should be placed 2 centimeters from the edge of the workpiece, and the second - exactly in the middle.
Important! In order for the holes to be symmetrical during drilling, fold the boards in one pile.
- Check the frame, wood elements and the accuracy of the layout. Correct if necessary.
- Next, countersink the finished holes. The countersink depth must first be calculated so that the bolt heads are flush.
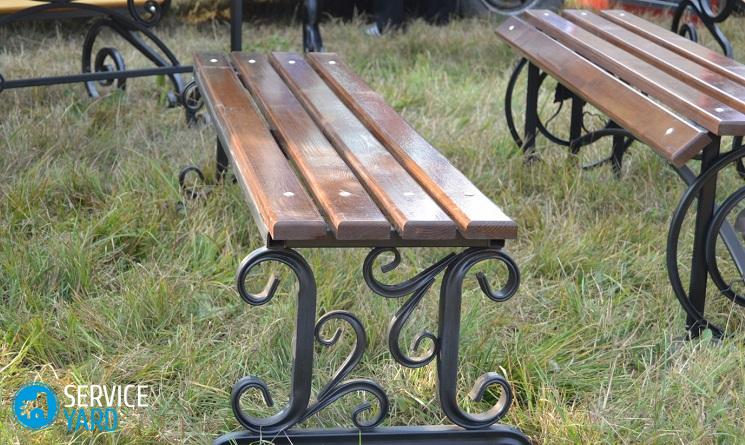
Once all the elements are prepared, you can proceed with the assembly of the bench:
- Put the finished boards on the frame, through the drilled holes, make a marking.
- According to the finished marking, using a drill bit for metal with a diameter of 6 millimeters, drill holes.
Important! During operation, the drill must be lowered horizontally.
- Cover the metal frame with Kuzbasslak and leave for a day at a temperature of 20 degrees.
- Dilute the woodwork varnish and cover it with 4 layers of wood, with an interval of one hour between layers.
Important! Diluted varnish penetrates much deeper, respectively - the quality of the coating is much more durable. To do this, dilute the varnish with solvent 646 in a 30-40% solution.
- Leave the boards covered with diluted varnish for a day until completely dry.
- Assemble all the elements in the finished structure by securing them with screws.
That's all, your new garden bench is ready!
DIY pipe profile table
Most of us have repeatedly met with such tables at school. Despite the fact that these pieces of furniture are not the most beautiful, nevertheless, they are quite durable. Therefore, if you need a table that can withstand significant loads, then this option is just perfect, especially for a personal plot.
Important! If desired, the finished product can be given some aesthetics by complicating the frame or by applying decorative finishes.
We bring to your attention the basic method of making a table from profile pipes with your own hands. The sequence of actions is as follows:
- From the professional pipe, cut 4 legs and crossbars, which will further connect them.
- Connect the finished fragments by welding.
Important! In the absence of a welding machine, you can connect fragments of the table to each other using bolts. To do this, first mark up and drill holes of the desired diameter.
- Install the countertop on top and fasten it with bolts.
Important! However, if you rely that you want a glass surface on a new garden table, then
without special glass-metal adhesive transparent, the idea will not succeed.
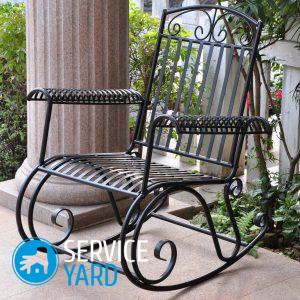
Do-it-yourself chair from a profile pipe
In this case, only the frame is made from the profile pipe, but the rest of the construction details can be made of wood, plastic or metal. It all depends solely on the availability of these details and your taste preferences.
To make a frame you will need:
- Profile pipe with dimensions of 20x40 millimeters in an amount of 10 pieces;
- Welding and electrodes;
- Bulgarian;
- Sander or sandpaper;
- Roulette;
- Corner;
- Ruler.
The procedure is as follows:
- Set aside 4 pipes for the manufacture of the frame and legs, and the remaining 2 for fastening the frame.
Important! Pay attention to the fact that the pipes for the manufacture of the frame must be paired and correspond to the desired width of the chair, and the other two to its height. As for the height of the finished product, it directly depends on the height of the legs, which is determined exclusively on an individual basis in accordance with your desire.
- Make a frame for the future table. To do this, measure the width and length of the future product, cut the pipes with a grinder. Using sandpaper or a sanding machine, clean them and fold them in a rectangle.
Important! During the manufacture of the frame, use a corner so that all joints are exactly at an angle of 90 degrees.
- Using weights, fix the finished elements and weld together. Thus, you get a rectangular frame for a chair.
- Attach the prepared legs to the inside of the finished frame. It is necessary to weld them strictly perpendicularly.
Important! Pre-check whether the legs are the same length, since in the future it will already be problematic to align it.
- Next, fix the wooden or plastic base.
DIY stool from the profile pipe is ready!
to contents ↑Important! In order to make a chair with a back, you need to make the pipes designed for the frame, which determine the width, twice as long, and then bend at the angle you need.
What else can be done from a professional pipe?
In addition to garden furniture, you can also make greenhouses and arbors with your own hands from a profile pipe. This is an ideal option for arranging both a suburban area and a personal territory.
Important! Pay attention to the fact that in the manufacture of small architectural structures you will need bent elements.
Profiled pipes with a rectangular section are quite easily assembled into the design you need. As a result, you will receive a reliable “house” for household needs. Such structures are able to withstand various atmospheric phenomena and loads. And if you equip such a gazebo with a table and benches, you will get a great place to gather with the whole family, receive guests and various country parties.
Important!! It is also worth thinking about filling the gazebo with a variety of furniture, and it is not necessary to buy it, just look around and carefully look at what you already have. Read about all interesting options in our blogs:
.
to contents ↑Stock footage
Profile pipes are a fairly easy-to-use material. Despite this, they have high strength and performance. If you decide to make furniture and other products from shaped pipes, you just need to purchase the right tool and be patient. And applying our recommendations in practice, you can make garden furniture, which will become the main decoration of your personal plot.


Report typo
Text to be sent to our editors: